Showing posts with label coat. Show all posts

Saturday, July 14, 2012

Transparent Rain Jacket


DSC_05333

Forever ago (really just January), I made this clear vinyl raincoat. I'd seen a few on the internet, and thought it would be really fun to do for a local fashion show. The fashion show was a smaller scale thing, and I asked my lovely friend Lindsay to model for me. It was a good show, fun stuff, good experience, but honestly, it was so long ago that I guess I don't have much to say about it!

421994_382287598464773_1850391489_n

Here's a photo of me and Lindsay (isn't she pretty?) after the show, courtesy of Lindsay's mom. Lindsay's wearing a quick dress I made, and I'm wearing another dress I had made. My dress unfortunately shrank a bit--just in the length, not the width, even though I prewashed the fabric. Ugh. I'll see if I can find more pictures of it, though... it was pretty cute! I think it was an accidental too-hot temperature setting or something that did it. Does this ever happen to you guys?


DSC_05303

Anyway, today we had a bit of a torrential downpour so I asked my mom to quick take pictures of the raincoat in action! It was so nice of her to help me out, as she had just been out in the rain herself, without an umbrella. We watched the storm on the porch and it was too cool. We got an inch and a half of rain in just half an hour!

DSC_0522

It was a ridiculous thing to make--there are special things you need to do to sew vinyl, like taping your presser foot and machine plate, and selecting the right needle--but that wasn't even the most difficult part. The challenge was moving the large, partially constructed garment around when the vinyl stuck to everything. It would just get caught on any plastic or metal surface and stick like a window cling.


IMG_2591

IMG_2590

I sewed every seam and then covered it with bias tape to hid to seam allowance. So every seam is bound and it's comfy to wear (well, as comfy as plastic can be), and it blocks out rain pretty well even at the stitch lines! And then I added those twisty things on the side panels just for some visual interest.

DSC_0524

Goofy. So there it is! A clear rain coat!

Thursday, May 24, 2012

Hinged

.

Here it is, the finished coat in all its glory!

.

Shot of the hand painted lining... You'll see another post on the blouse and the trousers!

.

The hand-distressed leather hinges, with snaps--and the curved welt pockets!

.

Leather flying yoke... If I could change anything, I would move the yoke to fit the back neck better! Alas, once snaps are set, they are set forever.

.

And I don't think I could possibly have anything more to say about this coat, except: runway photos from our fashion show!

542073_3239736804296_1760117263_n

524112_3239737244307_1593060458_32745854_608032501_n
(Above two photos taken by Hannah Riordan.)

I'm never modeling again. I was so nervous! But I think I did okay--I didn't fall, at least! I think the best part of looking at runway pictures is seeing people's reactions. Too funny.

show2
(Photo taken by my parents.)

And this was me, after the shows were all done, with my model & wonderful friend, Cassie! Perhaps you remember her from last year? This is a preview of things to come--I'll do another post on her outfit! It's a goodie.


Thursday, May 10, 2012

Tailor Made


IMG_2620

Making a coat is really, really time consuming. And hard. And fussy. But it's also a kind of magic--seeing the soft wool transform, molding it with the help of supportive devices and materials. It is incredible that all the ugly innards come together to create something so crisp and fitted. I certainly have a new kind of respect for all fine tailoring after this winter!

Let's start from the beginning. We were to make coats or blazers in my Advanced Pattern Development class this semester. The requirements were that it had to be wool, and had to have bound button holes, welt pockets, and a collar and lapel. I was heavily inspired by the 
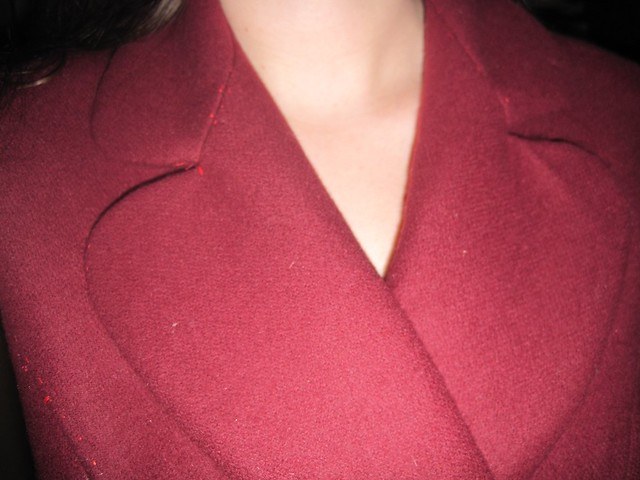
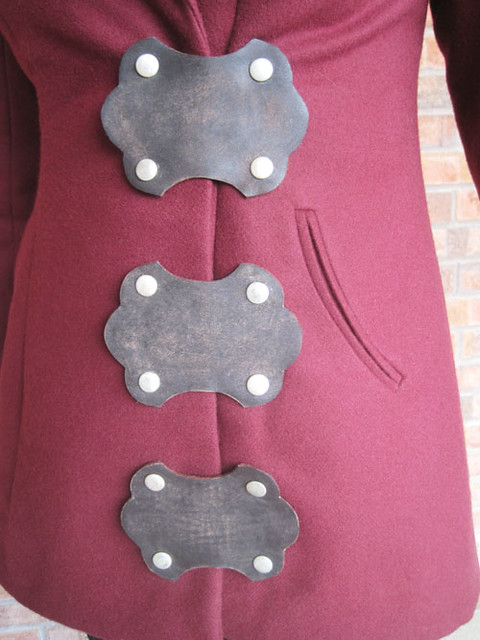
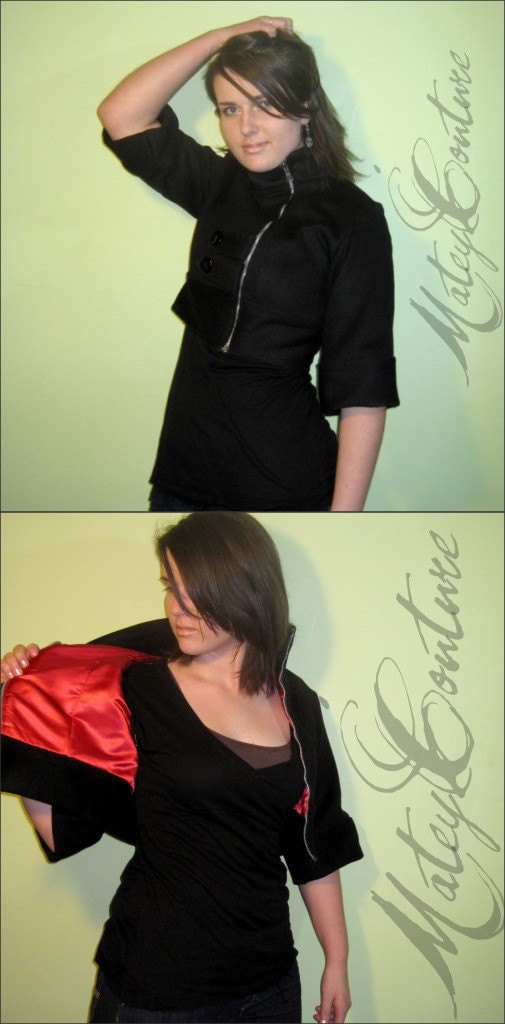
burgundy coat I designed for my women's line in my class last semester, but I had to translate the design from embossed leather to wool, so some heavy-handed changes ensued. I eventually discarded the front panel and the zipper, but kept the essence of the design by keeping the leather and the snaps.

We started by draping a basic long-torso sloper on mannequins. From here, we transferred the drape to paper, mocked up a muslin of the pattern, made necessary fit alterations, fixed the pattern, and then altered the pattern to the size necessary for a coat, adding a collar, lapel, and sleeves. I settled on a double breasted design with a curved collar and lapel, and a two-piece sleeve. We mocked these up, fitting them to ourselves instead of to the dress forms. And then we mocked them up again. And again. And again. I think I made 4 1/2 muslins in total, perfecting the fit as I went.

IMG_2597

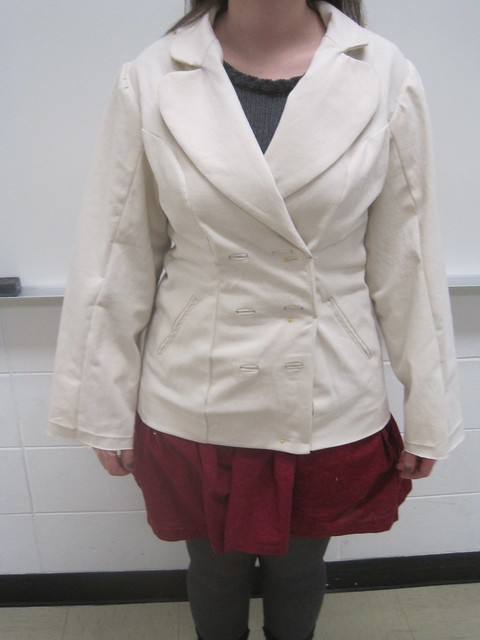
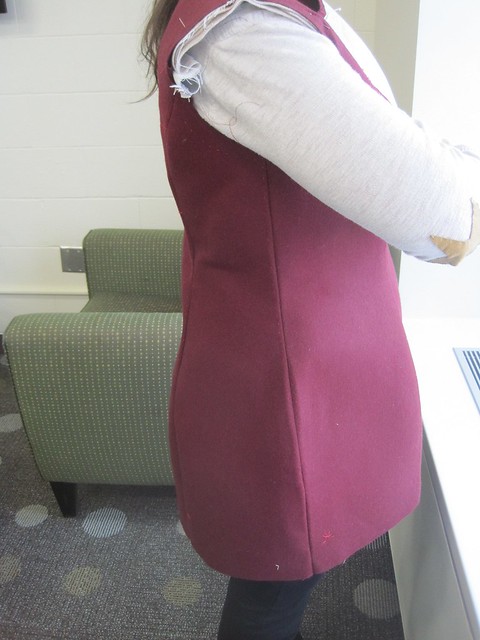
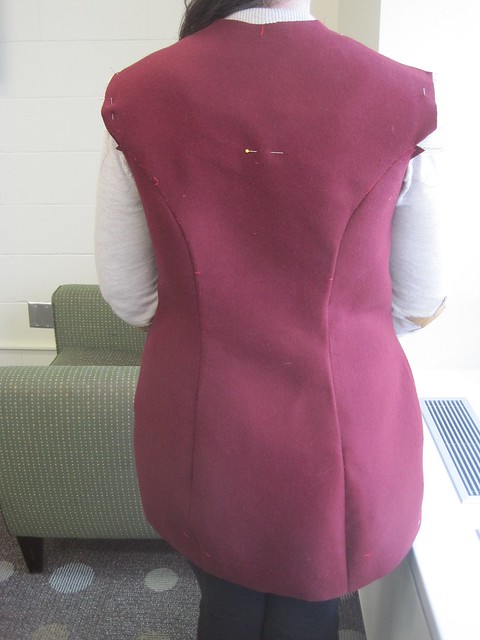
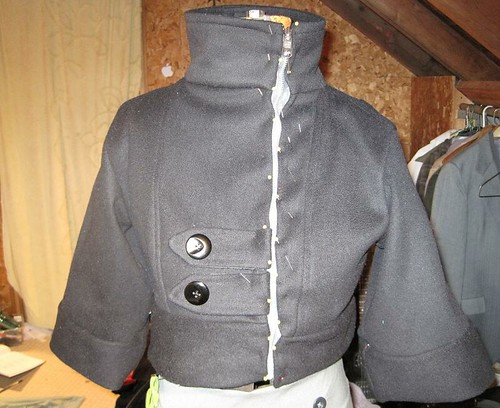
Here is one of my final muslins. It's a hideous thing, isn't it? All of those bound buttonholes were just for practice--yuck.


Just look at that sleeve! Terrible, I tell you.The shaded part of the pattern there is the alteration made to the sleeve to fix the fit.

Eventually, I got the pattern perfected enough to move on to the wool. I purchased two and a half yards of this beautiful burgundy 70% Wool 30% Cashmere Italian coating. It was $50 a yard--which is so, so not in my budget, but I was weak and it was all I had ever wanted in a fabric. It is luscious and soft and drapes beautifully and is just as perfect as can be. So I went for it, and I got white silk twill from Dharma Trading Co. to dye for the lining.

Before I could sew anything, we were told we had to thread trace the seam allowance and notches on all of the pieces. This took, oh, about twelve hours, and--can I be honest?--was the biggest waste of time, because after I did sew the thing together, I couldn't follow my original seam lines anyway! The pattern behaved differently in wool than in muslin, so it didn't matter where my seam line was in the end. Haha, I guess this is how you learn!

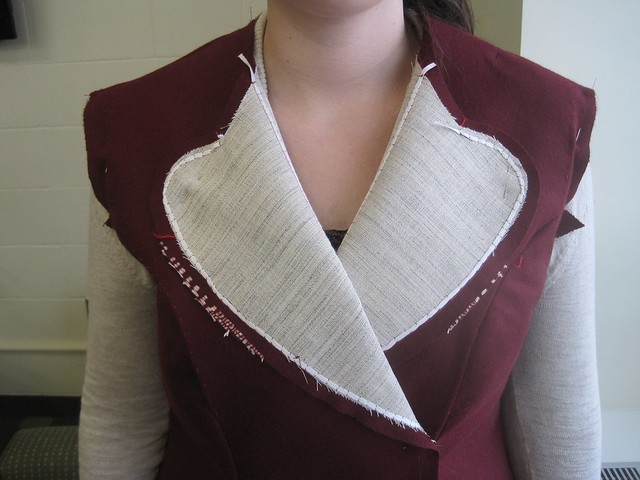
But then, after thread tracing, doing a baste-fit, and making necessary alterations, we could begin the real tailoring. Everything had to be interfaced, so I took apart my hand-basted garment. Instead of padstitching the entire garment, we were able to use fusible hair canvas interfacing. I still did my share of padstitching on the under collar with a bit of sew-in hair canvas, and let me tell you, that was enough for me! I am deluding myself into thinking that next time, I'll make a coat with a totally padstitched front and lapel. I'm sure I'll hate myself for it about six stitches in!

So, the body of the garment was interfaced with hair canvas, and the sleeves and facings with tricot. Then, I handstitched 1/8" twill tape along the edge of the lapels and front opening edge. I also stitched twill tape along the roll line, stretching the tape as I went, so that it had a natural roll that would last forever.

IMG_2610

See those itty-bitty stitches? See how they all match up on either side? What, obsessive? Me? No way.

Many hours of handstitching later...

IMG_2607

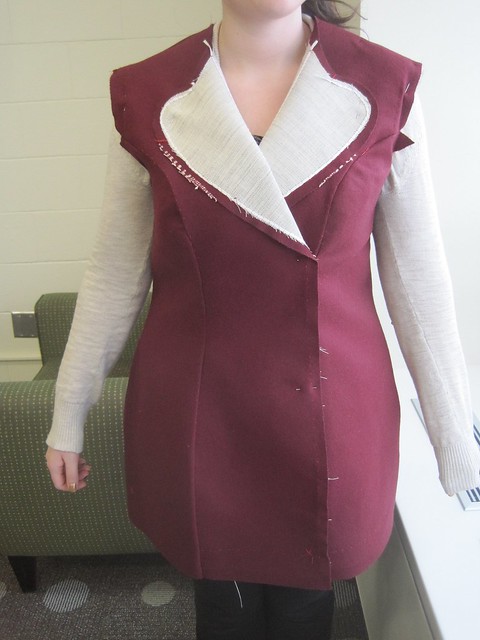
I sewed it for real!

IMG_2608

IMG_2609

And then took it out again. Besides fixing that back princess seam--who knows what went wrong there?--I had to take it in a tad, because the seams didn't look good unless I caught 1/16" of the interfacing in the seam allowance. Trial and error, I tell you.

Also, I had some leather work to do! I made a flying yoke, as you can see by the pattern development there, and cut it out of two layers of brown leather. I also cut out six hinge pieces for the front closure. These all had to be rubber-cemented, suede-sides together, and distressed with sand paper.

I went on a mad hunt to find a place to set my snaps for me, but I couldn't find any shop that would do it in the time frame I needed--and I really, really didn't want to leave my precious work with someone else for an extended period of time. I don't think anyone would have wanted me nervously hovering while they cut holes to set the snaps, which is surely what I would have insisted on! So, I bought a kit and did it myself, and probably angered a few people in my dorm with my hammering. Anyway, the snaps look great and seem like they'll hold forever, which was what I was worried about. However, I don't have any photos without showing the whole garment, so you'll just have to wait!

Other things I had to do for the garment were making shoulder pads and sleeve headers, and painting the lining an obnoxiously bright yellow. It turned out awesome!

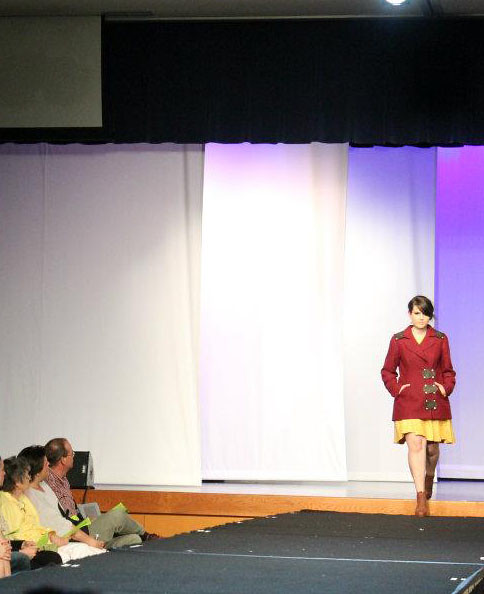
Ah, but here I've spent way too long writing this post and not enough time working on my project! These photos are pretty lackluster, but I'll post some of the finished thing next time. Maybe I'll even include some runway photos! If you've made it this far in this novel of a post--thanks for reading, even when I'm so long-winded!

Saturday, November 7, 2009

Cropped Jacket

I'm finally posting about that secret project I mentioned a while back! I hope the build-up wasn't too big for the actual project. Anyway, a few weeks ago, I received an email from Stephan Hoglund, a local photographer, wondering if I had anything to contribute to a winter photoshoot. I agreed to bring in the skirt, and said I'd try to get another piece together.

I had had a gigantic black wool coat lying around for about a year, and I'll admit, I was pretty terrified to cut into it. The insides of tailored coats are usually complicated, heavily stitched & interfaced, and unfortunately, if they're well worn, kind of messy. But when put under a deadline, I do my very best work, so when I had only three days to make the piece, I breathed in deeply & pulled out the seam ripper.

I sketched up five or six possible ideas, and then changed it again as I was in the process of making the new jacket, but all turned out well. I meticulously pressed ever single seam, and serged all the edges of the impossible polyester lining. The night before I was to bring it in, I stayed up until 2AM working on it, and then got up five hours later to finish. It was tedious, but very, very worth it.

Here's a shot I got that night, before it was finished. I fixed the un-evenness of the bottom band before I sewed the zipper in.


The details? Cropped length, swing sleeves, big cuffs, high collar, chunky metal off-center zipper, military-inspired tabs, and bright red lining.

Here are some of my favorite pictures:


There are also a few photos of me modeling it, which I'll post as soon as they're edited. This jacket will be for sale sometime this month in my shop, and the skirt will be re-listed at the same time.

So there you are, real, professional photos, and a jacket I'm extremely proud of. Thank you for looking!


Edit (11/11): I took a few "pick up" shots to get details for the listing on etsy, and wanted to post them here!

Cropped Jacket // Wool // Bright Red Lining // Small / Medium

Cropped Jacket // Wool // Bright Red Lining // Small / Medium


The jacket is now for sale, too, in my SHOP. xo!

Wednesday, April 8, 2009

Grand Canyon! Polkadot Coat! Which is a bigger deal?


So, I've been busy and up to a lot. I'm currently in New Mexico, on the tail end of the vacation. It's been fantastic--and warm--, but it'll be good to go home. I get to list my spring collection just a couple days later, too, which is pretty darn exciting for me! I hope you're excited too. :)


Here we are in Tucson, Arizona. Note to self: heels + walking a lot = ouch. But they were so adorable and we had lunch in a garden--what can I say? I couldn't resist!


I love my coat. Very much. It's from Delia*s (www.delias.com), and I was so happy that I could wear it on this trip.


We hiked down about 1.5 miles into the Grand Canyon. It was hard work! Especially going up. But very beautiful the entire way.


Remember this shirt? Remember how I said I was going to photograph it somewhere fantastic? I am so happy with how the photos turned out! I can't wait for you guys to see the rest of the clothes.

Today I bought some lovely, lovely fabric--China silk in a brilliant blue and a black to go with it. I'm going to make a skirt. It has the best drape ever! I will, of course, post pictures when I finish it. It's late here, so I'm off to bed!

Thursday, March 13, 2008

A Spring Coat

For spring weather!! It's been drippy the last two days and I finally got around to making myself something I've been planning on for months. Once again I officially fail at taking before pictures. I even thought of it, I was ripping apart the inside seams and it was still in tact, I was just too... erm... lazy. But if your imagination is good, think of a large, long, shoulder-padded men's formal coat with two buttons very low at the waist. Add a seam ripper, scissors, my dressform, a few pins, and the Complete Symphonic Recording of Les Miserables.

=


And here's a shot of this baby in action!


I am probably far too pleased with myself. It fits perfectly, and, being 100% wool, it is warm enough to wear in 30 degree + weather. I love spring clothes!