Thursday, December 1, 2016

The Just-About-the-Best-Day-Ever Dress


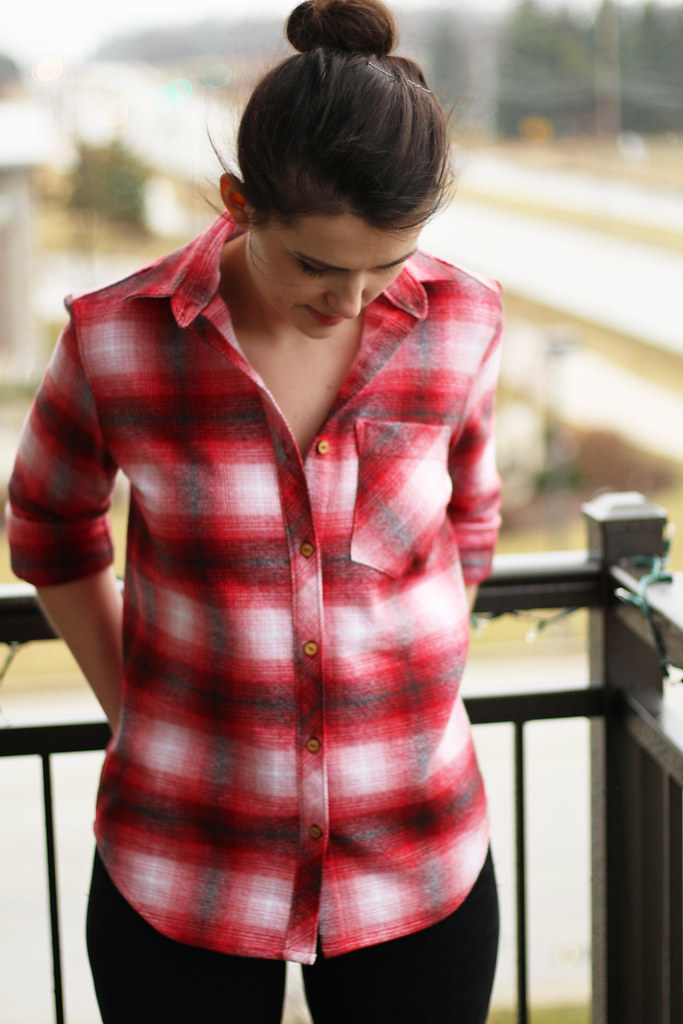
This dress is really special. I always have felt like there is a certain kind of magic when you wear a newly-made outfit for the first time, and this dress was no different. (Really, handmade clothes are a super power regardless of how new or old they are!) 

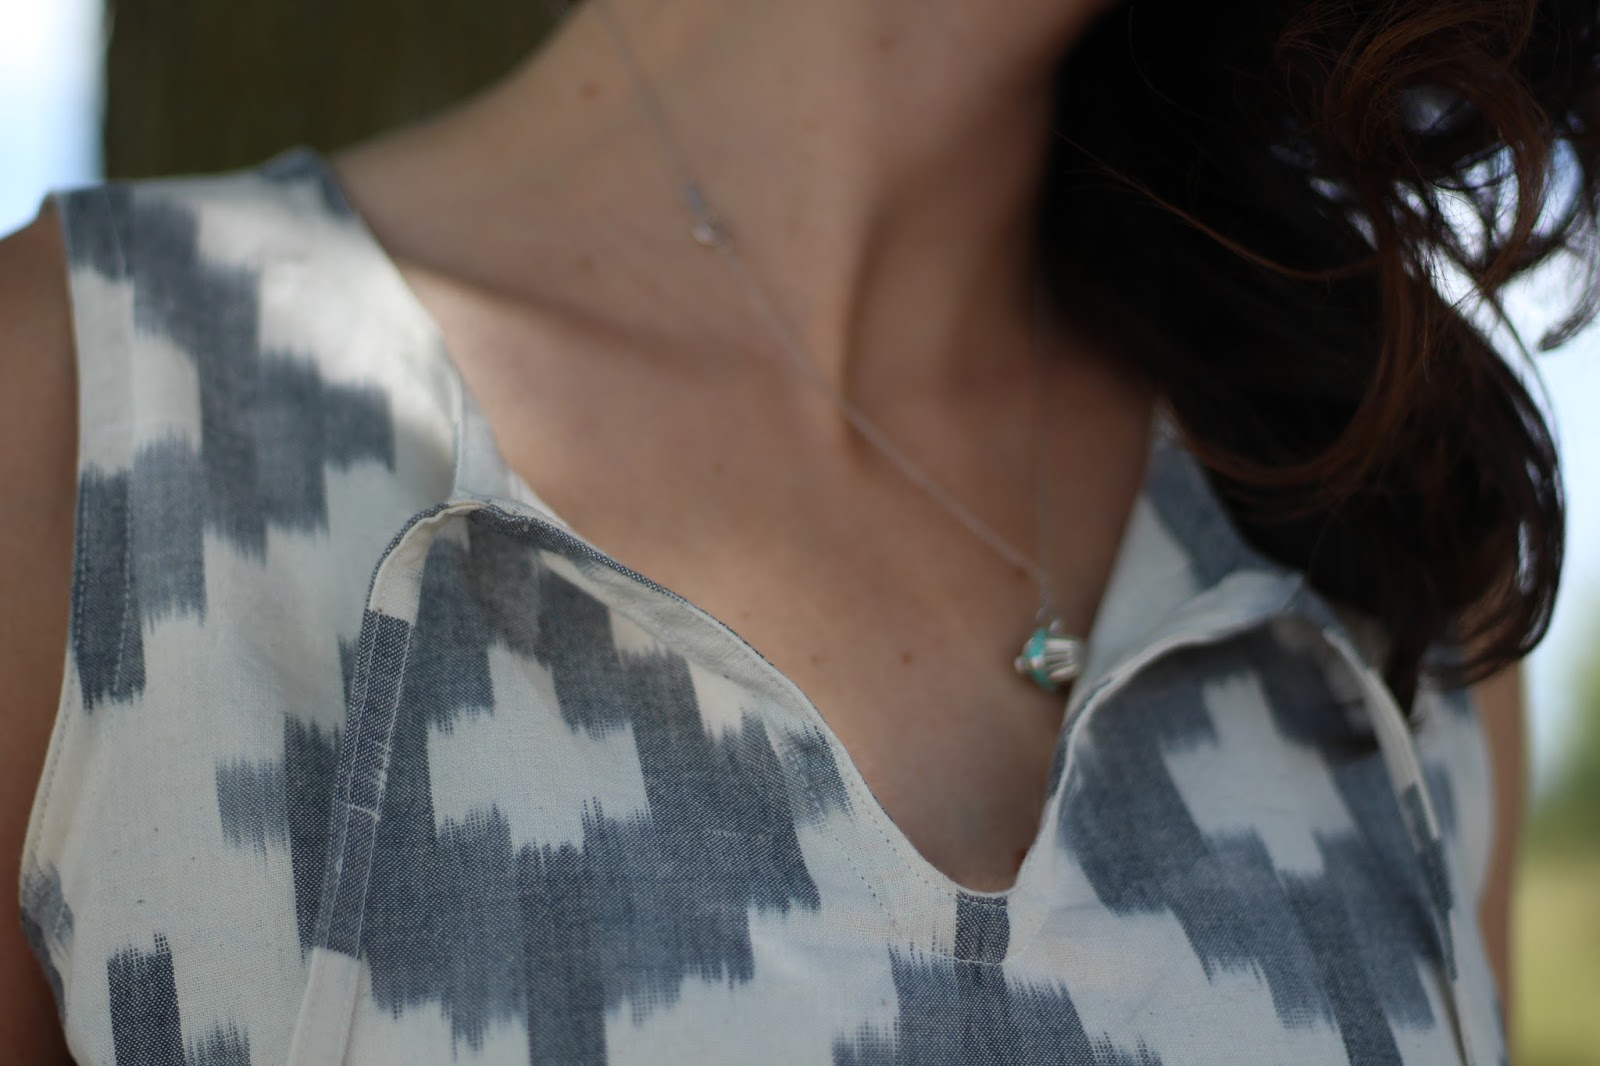
First, the fabric. The fabric! This is a beautiful ikat weave that I picked up at a stumbled-upon fabric sample sale from a really incredible Chicago company called Piece & Co. All of their fabrics are handcrafted by artisan women all over the world - in clean work environments with fair compensation. It was totally by happenstance that I ended up in this cool Chicago loft office filled with piles of some of the best textiles I've ever seen, and I have so much respect for the people who woven the gorgeous fabrics I got to purchase!


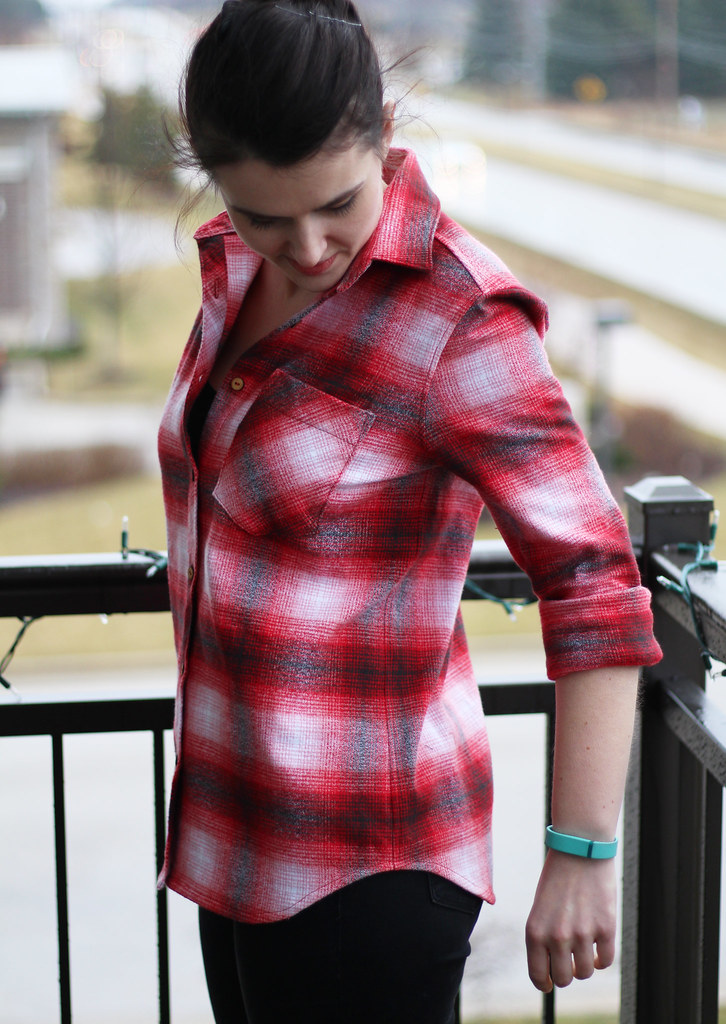
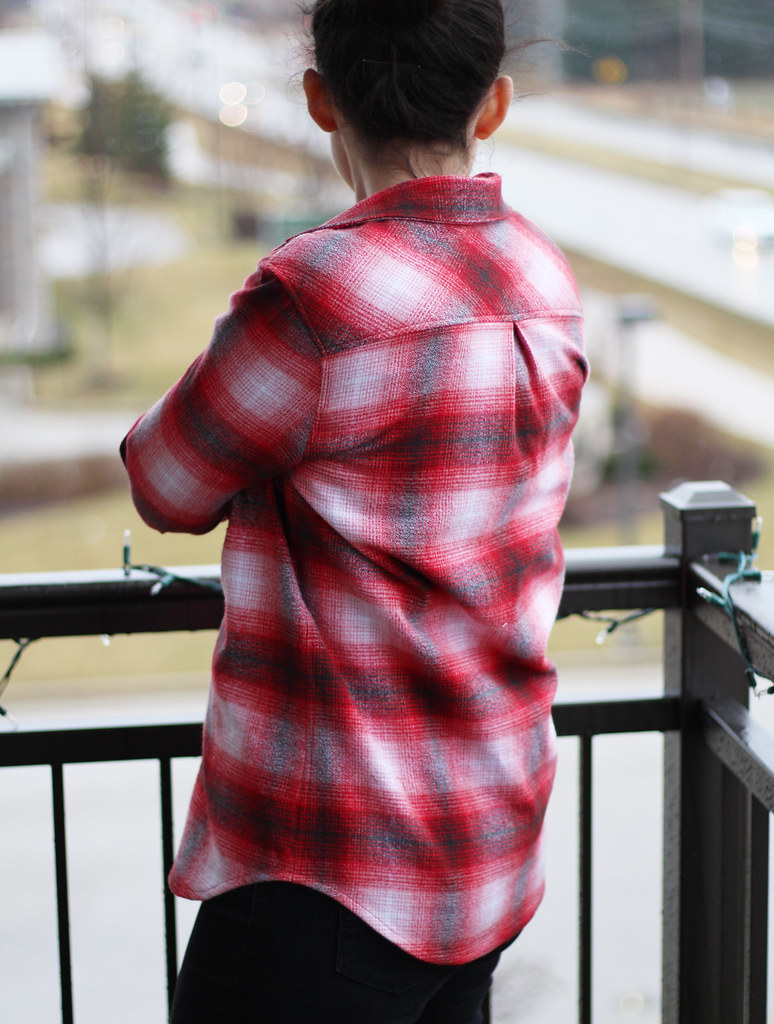
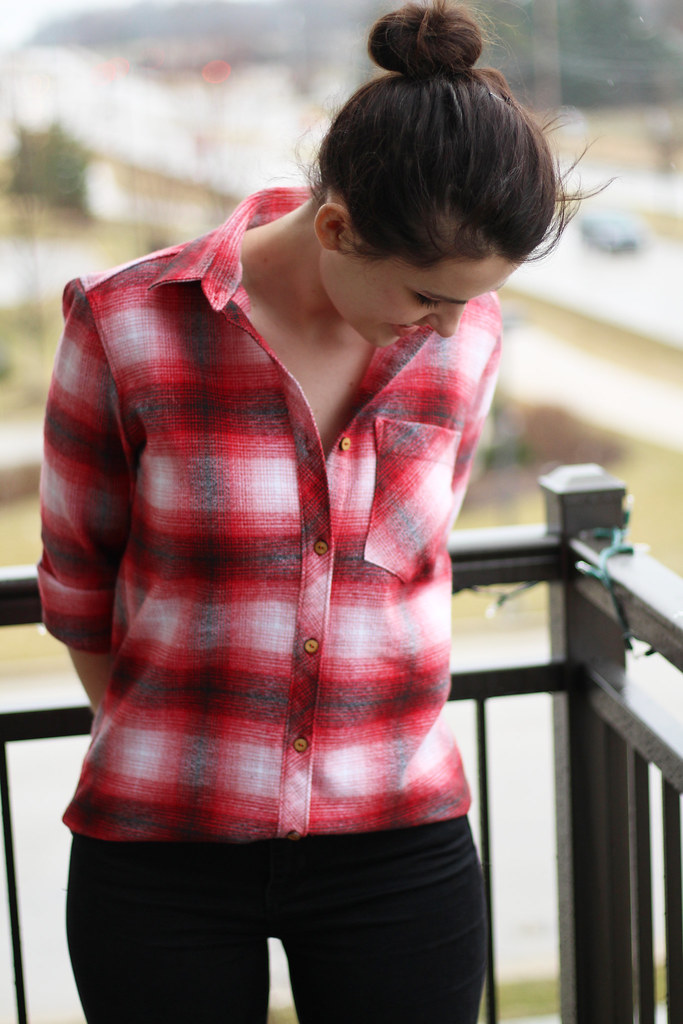
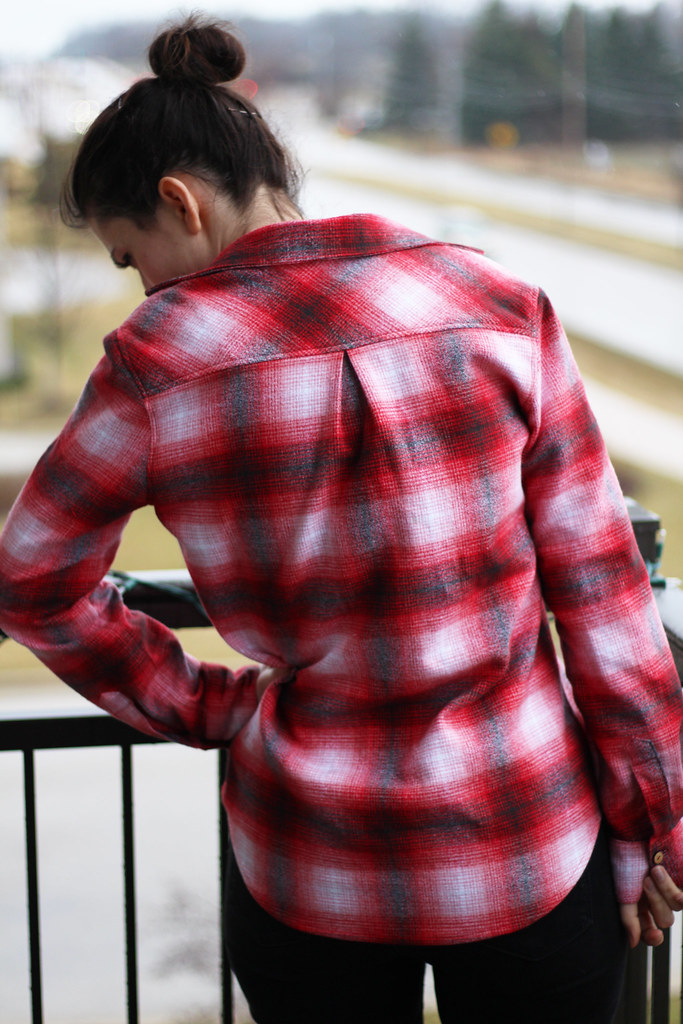
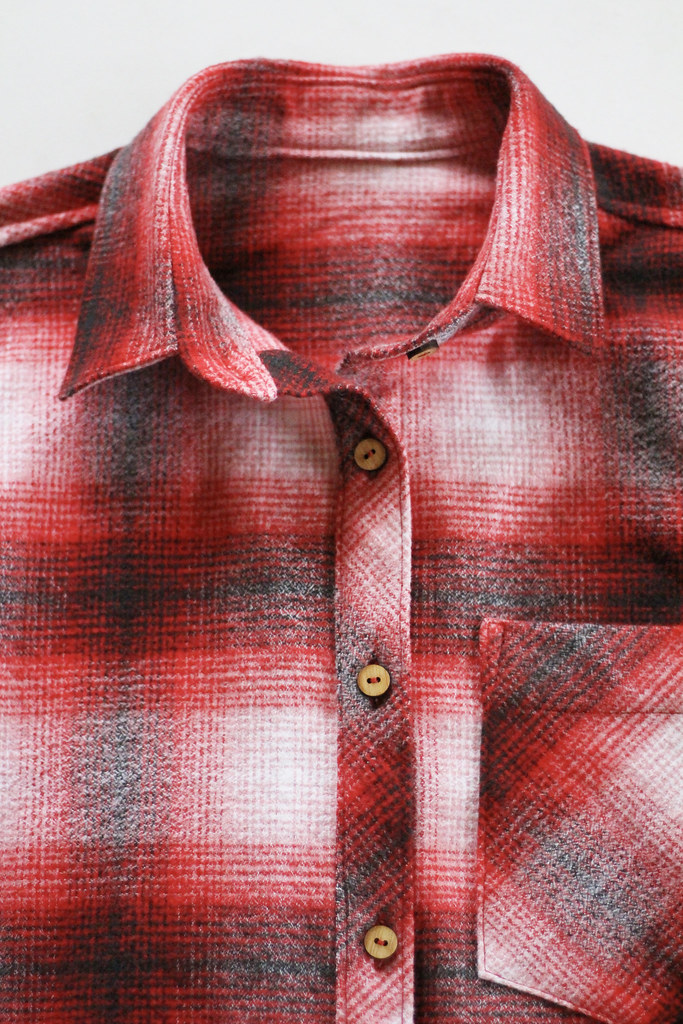
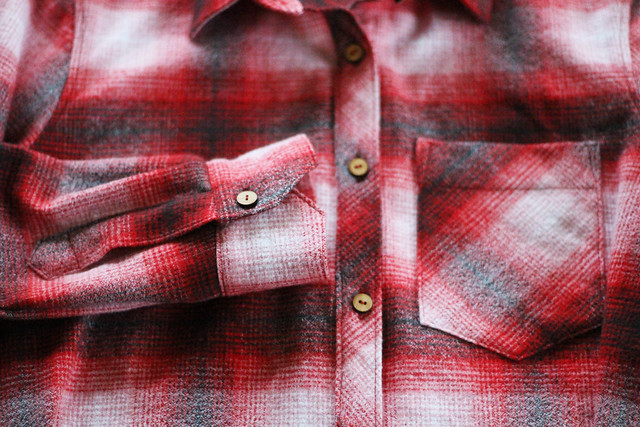
So this was one of the pieces of fabric I picked up -- it was already fated to be pretty great. I decided to make a dress in a silhouette I'm totally not used to wearing, but deemed it necessary because of the heat of summer. It's got a slight shirttail hem, a notched neckline with ties, and self bias binding along the hem, armholes, and neckline. And that's it! No darts, no zippers, no lining, no fuss. It took a day to finish. I made it entirely on my beloved Singer Featherweight (my main machine now - a gift from my dear aunt) - with french seams so it's all properly finished.


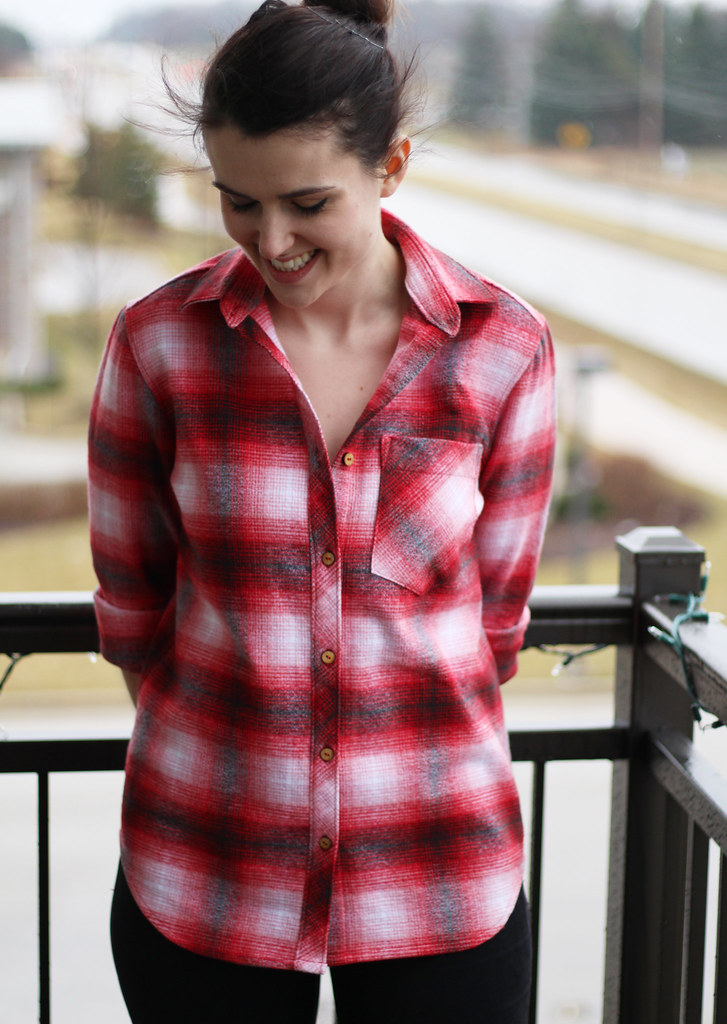
Oh but wait! Let me tell you about the magic of this dress! I wore it for the first time on the day I was offered my new position as a designer for kid's clothing. I had interviewed a couple weeks prior, and this was the day I found out. These photos were taken over lunch by a friend, before the meeting where I got the job -  but can you tell I was oozing happiness even so? Sometimes, a good, new, self-made outfit will do that (and more) for ya.


I legitimately feel this way pretty much every day ^. It's been the best job ever, and it started with this dress. It was for sure good luck. 

Sunday, November 20, 2016

Little updates :)

Hi, it's been a while! I've been a little busy, and thought about posting quite often. But boy, it's been a year. In the ways that years often go, it's been a mix of really great and really not great. There have been moments where my heart has felt so full it could burst, times where I couldn't seem to stop smiling if I tried, and also moments that make my throat catch to think about. But mostly I've been really happy, and working really hard, and trying to make every day better than the last. 

(There have been some really hard-to-top days...)


Mike and I are getting married in 2017! We are so excited and happy - I can't wait to build a life with him. :) 


And if you were wondering... yes, I'm making my dress! 

More soon - just wanted to loop you guys in before posting my backlog of projects!

Sunday, March 13, 2016

Woodsy Plaid Archer Button Up

IMG_4515

Another plaid flannel Archer! Are you sick of these yet? People started to catch on to how much I was wearing my other flannel, so I had to do the logical thing and make another one. I got more of this amazing Kaufman Mammoth flannel from Fabric.com, because it is in all actuality the perfect flannel. Such a great weight, so soft, and such a good quality.

IMG_4506

Not much is different on this one, except I took the sleeves in 1/4" to just slim them down ever-so-slightly. All internal seams are flat-felled, and I made the entire thing on my little Singer Featherweight machine, thanks to a little buttonhole attachment I picked up. This is my 4th Archer, and I find that I am still learning things! Mostly, don't skimp on pins. It's okay to have to rip things out. When in doubt, steam it out. Oh wait, those are things I remind myself with every sewing project!

IMG_4501

IMG_4508

IMG_4526

But seriously, as I was working on this, I was thinking about how glad I am to have this thing that I do (because I don't think calling it a "hobby" is nearly encompassing enough at this point) that I've just straight up always enjoyed, always done (well, since I was 12 or so), and can always continue to learn from and improve upon. Sewing and making clothes is my happy place. It's one thing I just don't get sick of, and as much as I do it, I'll never be 100% proficient at it - there is always room for improvement. It's humbling to continuously make mistakes, and to make very imperfect things, especially when it's in something I consider to be the strongest of my skills. I think part of the attraction of sewing is that you can always, always learn more.

IMG_4530


IMG_4570

Also let's talk about these buttons! These beautiful handmade wooden buttons are from Arrow Mountain, an awesome Etsy shop based out of Australia. I am so stoked on them - she has all kinds of cute designs, and I am already plotting which ones to order next! How cute do these look with this nice woodsy plaid??

IMG_4490

IMG_4492

That's all I've got for now. I did snag some amazing woven fabrics in Chicago last weekend, so expect to see some pretty blues and ikat weaves ASAP!

Follow along:

                  
This post does contain some affiliate links. Thanks for your support!

Sunday, February 14, 2016

Giant Knit Slouchy Beanie pt. 2!

IMG_4304

When I made the tutorial for this giant slouchy beanie, I did it with two different colors of roving, but I really wanted try it in all white to see how it turned out. I used roving from Dharma Trading, which I am really surprised and delighted by, and my size 50 knitting needles. It took only a couple hours to finish, and I made it out on the balcony to photograph it just in time before it got dark.

IMG_4306

And I really love how it turned out! It is super warm, very comfy, and quite cute. I'm always trying to be conscious of having cute winter gear, since it takes up such a large portion of my wardrobe. This fits the bill, I'd say!

IMG_4288

I just love roving, and I don't think this affair is going to end any time soon, to be honest.

IMG_4310

IMG_4309

And yeah. I'm wearing this shirt for forever. Don't judge.

IMG_4287

Tutorial for this hat is here, or you can buy the hat here. :)

Follow along:

                  
This post does contain some affiliate links. Thanks for your support!

Saturday, February 13, 2016

Americana Plaid Flannel Archer Button Up

girl sewing diy fashion design button down flannel hipster american plaid rolled up sleeves tutorial how to sew button collar sleeves do it yourself brunette woman midwest milwaukee sewing blog

I'm going to be real with you, I 100% copied this shirt from Lauren of Lladybird. I saw her Archer in this fabric and I had to have it. This fabric is my PERFECT plaid flannel. It is 100% what I've always wanted out of a plaid: American colors, big and bold, predominantly red. It's so rustic, but still polished.

girl sewing diy fashion design button down flannel hipster american plaid rolled up sleeves tutorial how to sew button collar sleeves do it yourself brunette woman midwest milwaukee sewing blog

Because I am clearly obsessed, let's talk about the fabric first. It is a Kauffman Mammoth flannel, ordered from Fabric.com. It's double napped, which means it has been brushed on both sides, so it is extra warm. Make no mistake, this also means it is very susceptible to shrinkage! Flannel tends to shrink more than other fabrics, something I know well from my job, since I work in men's lounge wear -- lots of flannel pajama pants. I always pre-wash my fabrics, usually in a more extreme manner than I will be caring for the garment, and I was slightly worried when I only pre-washed this once. So I was really, really fearful when I threw this in the washer for the first time as a full garment. What if I totally ruined my brand new shirt?! Here's the wonderful news: IT DIDN'T SHRINK. I hung it to dry, but since shrinkage happens in the washing cycle too, I don't credit this to the fact that I air-dried it. This fabric. Is awesome. Who wants to hand-wash a button-down? Super stoked.

girl sewing diy fashion design button down flannel hipster american plaid rolled up sleeves tutorial how to sew button collar sleeves do it yourself brunette woman midwest milwaukee sewing blog


girl sewing diy fashion design button down flannel hipster american plaid rolled up sleeves tutorial how to sew button collar sleeves do it yourself brunette woman midwest milwaukee sewing blog

The pattern is the Archer Button Up from Grainline Studios. This is the 3rd shirt I've made using this pattern (this was the firstthis was the second), but I don't think I've quite corrected the fit yet. Overall I am pleased with how the body fits, but I think the sleeves are slightly bigger than I would like, especially through the forearm. I'm thinking I might try closing the pleats next time?

I actually finished this a few weeks ago, just in time for a trip to Baltimore to visit a friend. I definitely was rushing to get it done in time to take it with, and stayed up until 1am the night of my 6am flight to set the buttonholes. I haven't done that nonsense since college! But it was worth it! Because I was going the weekend of the Jonas blizzard, our travel plans got moved around and we went to Philadelphia airport first, and then took the train up to Baltimore. I hadn't gotten a chance to sew on the buttons but I was totally wearing the shirt open over a t-shirt anyway. So on the train, I pulled it off, got out my thread and buttons, and started sewing away. Definitely got some funny looks from my seat-mate!

girl sewing diy fashion design button down flannel hipster american plaid rolled up sleeves tutorial how to sew button collar sleeves do it yourself brunette woman midwest milwaukee sewing blog

I'm glad I pushed so hard to finish it, too, because when we were snowed in that weekend, I wanted nothing more than to wear this cozy thing! 

While I was careful to plaid-match at CF and at the side seams, I did not at all plan the matching from sleeves to body. Accidents that look time-consuming? Yes, please!

girl sewing diy fashion design button down flannel hipster american plaid rolled up sleeves tutorial how to sew button collar sleeves do it yourself brunette woman midwest milwaukee sewing blog

girl sewing diy fashion design button down flannel hipster american plaid rolled up sleeves tutorial how to sew button collar sleeves do it yourself brunette woman midwest milwaukee sewing blog

One other thing I did differently from last time was to change up the placket from the continuously bound one that comes with the pattern. Instead, I followed this tutorial from Off the Cuff. While I am pretty pleased with the results, I think this method might not be a good fit for fabric this bulky, because there isn't a way to trim the excess from the bottom of the placket, and there is quite a bit of fabric tucked under from making the point. I also think I made my placket a little too long, but since I wear my shirtsleeves rolled up 90% of the time anyway, it doesn't matter!

girl sewing diy fashion design button down flannel hipster american plaid rolled up sleeves tutorial how to sew button collar sleeves do it yourself brunette woman midwest milwaukee sewing blog

The back yoke, pocket, and front placket were all cut on the bias. All seams are flat-felled, which I love, because it makes the shirt feel like it could last a lifetime. But... maybe not at the rate that I've been wearing this. No biggie, I already ordered more Kaufman Flannel (different colorways) for more Archer shirts. Not even sorry.

girl sewing diy fashion design button down flannel hipster american plaid rolled up sleeves tutorial how to sew button collar sleeves do it yourself brunette woman midwest milwaukee sewing blog

girl sewing diy fashion design button down flannel hipster american plaid rolled up sleeves tutorial how to sew button collar sleeves do it yourself brunette woman midwest milwaukee sewing blog


Follow along:


This post does contain some affiliate links. Thanks for your support!

Monday, February 8, 2016

Finished Project: Camilla Babe Sweater


It took me about four months longer than it should have, but I finally finished this little sweater for my niece! I started it way back in August, shortly after she was born, and knit the bulk of it on a series of plane rides from North Carolina to Alaska. I didn't quite finish it during my visit up there, and after I got home, it fell the the side. All I had left to do was sew the underarm seams and weave in the ends, and it sat for months in that state! How silly! 

handmade diy knitting handknit sweater camilla babe quince and co fan pattern garter stitch merino wool baby sweater

Luckily, I made a six-month size and it turned out big anyway, so it is still going to fit her. This is the Camilla Babe pattern from Quince & Co, and I've always thought it was just the sweetest little pattern. It is knit bottom up, seamless, so it's really comfortable for a little one to wear (presumably). It was for the most part a breeze to knit, but because I had never knit a sweater bottom-up before, I did have a hard time wrapping my head around the joining of the sleeves to the body. Once my knitting buddy from work explained that it was like three tubes joining together to become one tube, it clicked for me. Funny how we get tripped up on these little things, isn't it?

handmade diy knitting handknit sweater camilla babe quince and co fan pattern garter stitch merino wool baby sweater

I used some amazingly soft merino superwash DK weight, which I actually went in on with my aforementioned knitting buddy, and I can't remember the site we got it from. But it was like $3/skein, so I bought a LOT... and then went on a yarn diet for an extended period of time. Speaking of, I should really do that again. It's great for stash busting!

handmade diy knitting handknit sweater camilla babe quince and co fan pattern garter stitch merino wool baby sweater

One more project off the needles. I can't wait to see my niece wear it when I visit Alaska in April! Ravelry link is here!

Sunday, February 7, 2016

Tutorial: How to Knit a Slouchy Beanie with Colorblocking - Roving

hat knitting tutorial diy craft how to knit a hat maker make makers gonna make handmade fashion chunky roving giant knit fluffy colorblocked wool made in the usa i made this clothing refashion

Apologies for the unintentional hiatus! January got away from me, in a good kind of way. I finished up a few projects (including this shirt! I'll post it soon!), traveled to Baltimore during their big blizzard, and got a new cat (!). Happy February!

hat knitting tutorial diy craft how to knit a hat maker make makers gonna make handmade fashion chunky roving giant knit fluffy colorblocked wool made in the usa i made this clothing refashion

This is a tutorial for a chunky knit roving hat with colorblocking. It is super simple and fast and fun! I also cannot decide if I even like the hat or not, haha! I ran out of the blue, and I think I would like it more if it had more than a smidge of blue at the end. But you know, you win some and you lose some.

Because this is hat is knit with roving, the first thing you'll need to do is make your yarn! You can do this following my instructions in my previous tutorial, for the giant knit cowl. You will need to divide and set a slight twist into the roving to create your yarn:

hat knitting tutorial diy craft how to knit a hat maker make makers gonna make handmade fashion chunky roving giant knit fluffy colorblocked wool made in the usa i made this clothing refashion

You can learn the details of that technique HERE!

Okay, so for this project, you'll need about 100 grams of roving, or two skeins of Knitpick's roving.  You can really use any roving that's combed into a long strand. Here I used some creamy white roving, and some beautiful sapphire blue Knitpick's Wool of the Andes roving, left over from other projects. You can adjust your colorblocking to be any length, or you can skip it altogether! 

hat knitting tutorial diy craft how to knit a hat maker make makers gonna make handmade fashion chunky roving giant knit fluffy colorblocked wool made in the usa i made this clothing refashion

You will also need size 50 (25 mm) circular knitting needles. I like these ones from Knitter's Pride

With you main color, start by casting on 16 stitches, using the long-tail cast-on method.

hat knitting tutorial diy craft how to knit a hat maker make makers gonna make handmade fashion chunky roving giant knit fluffy colorblocked wool made in the usa i made this clothing refashion

Join in the round.

hat knitting tutorial diy craft how to knit a hat maker make makers gonna make handmade fashion chunky roving giant knit fluffy colorblocked wool made in the usa i made this clothing refashion

Begin to knit 1x1 rib.

hat knitting tutorial diy craft how to knit a hat maker make makers gonna make handmade fashion chunky roving giant knit fluffy colorblocked wool made in the usa i made this clothing refashion

hat knitting tutorial diy craft how to knit a hat maker make makers gonna make handmade fashion chunky roving giant knit fluffy colorblocked wool made in the usa i made this clothing refashion

Splice your yarn as necessary!

hat knitting tutorial diy craft how to knit a hat maker make makers gonna make handmade fashion chunky roving giant knit fluffy colorblocked wool made in the usa i made this clothing refashion

Watch it (quickly!) grow...

hat knitting tutorial diy craft how to knit a hat maker make makers gonna make handmade fashion chunky roving giant knit fluffy colorblocked wool made in the usa i made this clothing refashion

Knit in rib for 8 rounds (or desired amount). Switch to your second color:

hat knitting tutorial diy craft how to knit a hat maker make makers gonna make handmade fashion chunky roving giant knit fluffy colorblocked wool made in the usa i made this clothing refashion

Proceed in 1x1 rib for two more rounds.

hat knitting tutorial diy craft how to knit a hat maker make makers gonna make handmade fashion chunky roving giant knit fluffy colorblocked wool made in the usa i made this clothing refashion

On round 11, k2tog 8 times. 8 sts remaining.

hat knitting tutorial diy craft how to knit a hat maker make makers gonna make handmade fashion chunky roving giant knit fluffy colorblocked wool made in the usa i made this clothing refashion

Pull your loose end through the 8 remaining stitches.

hat knitting tutorial diy craft how to knit a hat maker make makers gonna make handmade fashion chunky roving giant knit fluffy colorblocked wool made in the usa i made this clothing refashion

Pull tightly, tie a knot, and weave in all loose ends.

hat knitting tutorial diy craft how to knit a hat maker make makers gonna make handmade fashion chunky roving giant knit fluffy colorblocked wool made in the usa i made this clothing refashion

How easy was that?! Even with spinning the roving, this can easily be done in a couple hours! It is one-size-fits-most, and you can easily increase or decrease as needed. For reference, I have a 22 1/2" head circumference (pretty standard).

hat knitting tutorial diy craft how to knit a hat maker make makers gonna make handmade fashion chunky roving giant knit fluffy colorblocked wool made in the usa i made this clothing refashion

This is so easily customizable, and I think would look really cute with different amounts of colorblocking, or stripes, or no colorblocking! You do you!

hat knitting tutorial diy craft how to knit a hat maker make makers gonna make handmade fashion chunky roving giant knit fluffy colorblocked wool made in the usa i made this clothing refashion

hat knitting tutorial diy craft how to knit a hat maker make makers gonna make handmade fashion chunky roving giant knit fluffy colorblocked wool made in the usa i made this clothing refashion beanie slouchy hipster hat winter cold weather gear

Here is the Ravelry link - add me, heart it up, all of that good stuff. I would love to see photos if you make this! Thanks for reading through! 

hat knitting tutorial diy craft how to knit a hat maker make makers gonna make handmade fashion chunky roving giant knit fluffy colorblocked wool made in the usa i made this clothing refashion beanie slouchy hipster hat winter cold weather gear